
Furkan Yavuz
Verified Expert in Engineering
Furkan是一名经验丰富的全栈开发人员,自2016年以来一直远程工作. 他的主要专长包括Java、Angular和Heroku.
Expertise
Previously At

Furkan是一名经验丰富的全栈开发人员,自2016年以来一直远程工作. 他的主要专长包括Java、Angular和Heroku.
在本系列文章中,我们将开发一个静态内容网站原型. It will generate daily-updated, 简单的静态HTML页面,用于流行的GitHub存储库,以跟踪其最新版本. 静态网页生成框架有很好的功能来实现这一点——我们将使用Gatsby.js, one of the most popular.
In Gatsby, 有许多方法可以在没有后端(无服务器)的情况下为前端收集数据。, Headless CMS platforms and Gatsby source plugins among them. 但是我们将实现一个后端来存储关于GitHub存储库及其最新版本的基本信息. 因此,我们将完全控制我们的后端和前端.
此外,我还将介绍一组触发应用程序每日更新的工具. 您也可以手动触发它,或者在某些特定事件发生时触发它.
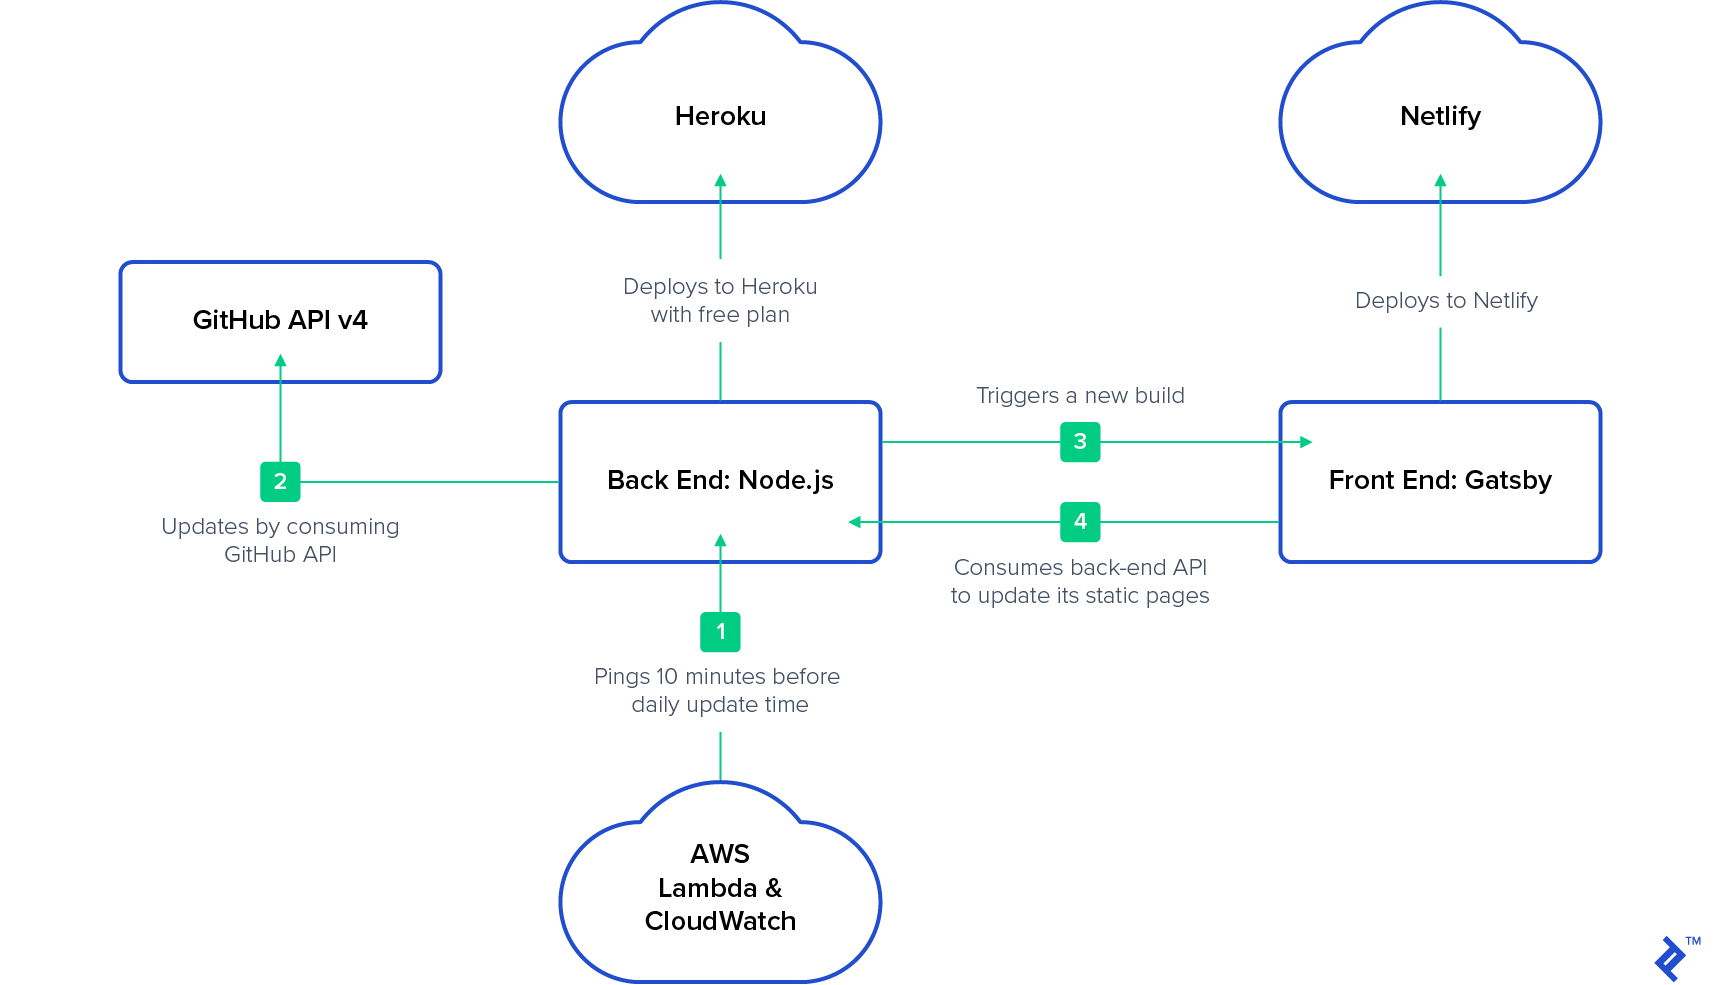
我们的前端应用程序将在netflix上运行, 后端应用程序将使用免费计划在Heroku上运行. It will sleep periodically: “When someone accesses the app, dyno管理器将自动唤醒web dyno以运行web进程类型.” So, we can wake up it via AWS Lambda and AWS CloudWatch. 在撰写本文时,这是让原型全天候在线的最具成本效益的方法.
To keep these articles focused on one topic, I won’t be covering authentication, validation, scalability, or other general topics. 本文的编码部分将尽可能简单. 项目的结构和正确的工具集的使用更为重要.
在本系列的第一部分中,我们将开发和部署后端应用程序. In the second part,我们将开发和部署前端应用程序,并触发每日构建.
The back-end application will be written in Node.js (不是强制性的,但为了简单起见),所有的通信都将通过REST api. 在这个项目中,我们不会从前端收集数据. (如果你有兴趣的话,可以看看 Gatsby Forms.)
First, 我们将从实现一个简单的REST API后端开始,该后端公开MongoDB中存储库集合的CRUD操作. 然后,我们将调度一个使用GitHub API v4 (GraphQL)的cron作业,以便更新此集合中的文档. 然后我们将所有这些部署到Heroku云. 最后,我们将在cron作业结束时触发前端的重建.
在第二篇文章中,我们将重点介绍 createPages API. 我们将从后端收集所有存储库,并生成一个包含所有存储库列表的主页, 为返回的每个存储库文档添加一个页面. Then we’ll deploy our front end to Netlify.
如果您的应用程序不休眠,则此部分不是强制性的. Otherwise, 您需要确保在更新存储库时后端已启动并运行. As a solution, 您可以在每日更新前10分钟在AWS CloudWatch上创建cron计划,并将其作为触发器绑定到您的 GET method in AWS Lambda. 访问后端应用程序将唤醒Heroku实例. 更多细节将在第二篇文章的末尾介绍.
下面是我们将要实现的架构:
我假设本文的读者具备以下方面的知识:
It’s also good if you know:
让我们深入了解后端实现. We’ll split it into two tasks. 第一个是准备REST API端点,并将它们绑定到我们的存储库集合. 第二个是实现一个cron作业,它使用GitHub API并更新集合.
我们将使用Express作为web应用程序框架,使用Mongoose作为MongoDB连接. 如果您熟悉Express和Mongoose,则可以跳到步骤2.
(另一方面,如果您需要更熟悉Express,您可以退房 the official Express starter guide; if you’re not up on Mongoose, the official Mongoose starter guide should be helpful.)
我们的项目的文件/文件夹层次结构将是简单的:
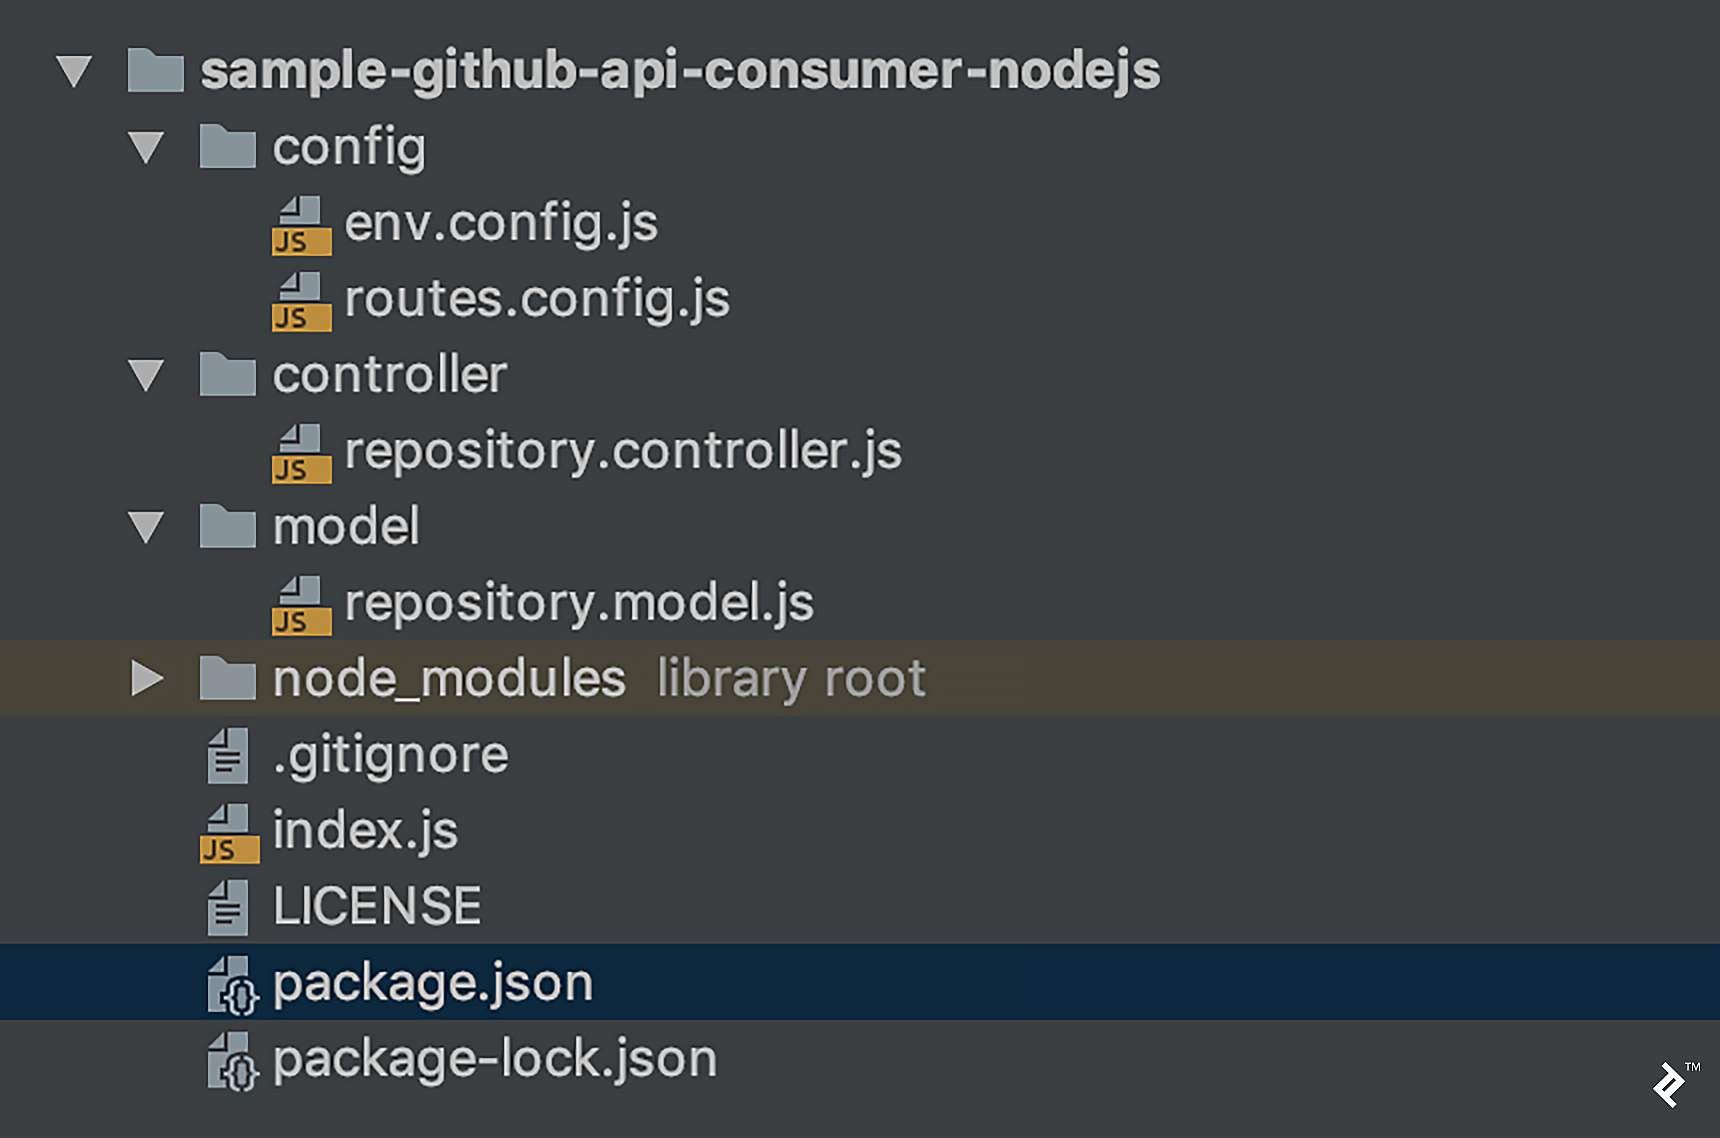
In more detail:
env.config.js 环境变量是否为配置文件routes.config.js is for mapping rest endpointsrepository.controller.js 包含在储存库模型上工作的方法repository.model.js 包含存储库和CRUD操作的MongoDB模式index.js is an initializer classpackage.json contains dependencies and project propertiesRun npm install (or yarn(如果您安装了Yarn),然后将这些依赖项添加到 package.json:
{
  // ...
  "dependencies": {
    "body-parser": "1.7.0",
    "express": "^4.8.7",
    "moment": "^2.17.1",
    "moment-timezone": "^0.5.13",
    "mongoose": "^5.1.1",
    "node-uuid": "^1.4.8",
    "sync-request": "^4.0.2"
  }
  // ...
}
Our env.config.js file has only port, environment (dev or prod), and mongoDbUri properties for now:
module.exports = {
  "port": process.env.PORT || 3000,
  "environment": "dev",
  "mongoDbUri": process.env.MONGODB_URI || "mongodb://localhost/github-consumer"
};
routes.config.js 包含请求映射,并将调用控制器的相应方法:
const RepositoryController = require('../controller/repository.controller');

exports.routesConfig = function(app) {

  app.post('/repositories', [
    RepositoryController.insert
  ]);

  app.get('/repositories', [
    RepositoryController.list
  ]);

  app.get('/repositories/:id', [
    RepositoryController.findById
  ]);

  app.patch('/repositories/:id', [
    RepositoryController.patchById
  ]);

  app.delete('/repositories/:id', [
    RepositoryController.deleteById
  ]);
};
The repository.controller.js file is our service layer. 它的职责是调用我们的存储库模型的相应方法:
const RepositoryModel = require('../model/repository.model');

exports.insert = (req, res) => {
  RepositoryModel.create(req.body)
    .then((result) => {
      res.status(201).send({
        id: result._id
      });
    });
};

exports.findById = (req, res) => {
  RepositoryModel.findById(req.params.id)
    .then((result) => {
      res.status(200).send(result);
    });
};

exports.list = (req, res) => {
  RepositoryModel.list()
    .then((result) => {
      res.status(200).send(result);
    })
};

exports.patchById = (req, res) => {
  RepositoryModel.patchById(req.params.id, req.body)
    .then(() => {
      res.status(204).send({});
    });
};

exports.deleteById = (req, res) => {
  RepositoryModel.deleteById(req.params.id, req.body)
    .then(() => {
      res.status(204).send({});
    });
};
repository.model.js 处理MongoDb连接和存储库模型的CRUD操作. The fields of the model are:
owner: The repository owner (company or user)name: The repository namecreatedAt: The last release creation dateresourcePath: The last release pathtagName: The last release tagreleaseDescription: Release noteshomepageUrl: The project’s home URLrepositoryDescription: The repository descriptionavatarUrl: The project owner’s avatar URLconst Mongoose = require('mongoose');
const Config = require('../config/env.config');
const MONGODB_URI = Config.mongoDbUri;
Mongoose.connect(MONGODB_URI, {
useNewUrlParser: true
});
const Schema = Mongoose.Schema;
const repositorySchema = new Schema({
owner: String,
name: String,
createdAt: String,
resourcePath: String,
tagName: String,
releaseDescription: String,
homepageUrl: String,
repositoryDescription: String,
avatarUrl: String
});
repositorySchema.virtual('id').get(function() {
return this._id.toHexString();
});
// Ensure virtual fields are serialised.
repositorySchema.set('toJSON', {
virtuals: true
});
repositorySchema.findById = function(cb) {
return this.model('Repository').find({
id: this.id
}, cb);
};
const Repository = Mongoose.model('repository', repositorySchema);
exports.findById = (id) => {
return Repository.findById(id)
.then((result) => {
if (result) {
result = result.toJSON();
delete result._id;
delete result.__v;
return result;
}
});
};
exports.create = (repositoryData) => {
const repository = new repository (repositoryData);
return repository.save();
};
exports.list = () => {
return new Promise((resolve, reject) => {
Repository.find()
.exec(function(err, users) {
if (err) {
reject(err);
} else {
resolve(users);
}
})
});
};
exports.patchById = (id, repositoryData) => {
return new Promise((resolve, reject) => {
Repository.findById(id, function(err, repository) {
if (err) reject(err);
for (let i in repositoryData) {
repository[i] = repositoryData[i];
}
repository.save(function(err, updatedRepository) {
if (err) return reject(err);
resolve(updatedRepository);
});
});
})
};
exports.deleteById = (id) => {
return new Promise((resolve, reject) => {
Repository.deleteOne({
_id: id
}, (err) => {
if (err) {
reject(err);
} else {
resolve(err);
}
});
});
};
exports.findByOwnerAndName = (owner, name) => {
return Repository.find({
owner: owner,
name: name
});
};
This is what we have after our first commit: A MongoDB connection and our REST operations.
我们可以用下面的命令运行我们的应用程序:
node index.js
For testing, send requests to localhost:3000 (using e.g. Postman or cURL):
Post: http://localhost:3000/repositories
Body:
{
  "owner" : "facebook",
  "name" :  "react"
}
Get: http://localhost:3000/repositories
Get: http://localhost:3000/repositories/:id
Patch: http://localhost:3000/repositories/:id
Body:
{
  "owner" : "facebook",
  "name" :  "facebook-android-sdk"
}
有了这些工作,是时候自动化更新了.
In this part, 我们将配置一个简单的cron作业(将在UTC午夜开始)来更新我们插入到数据库中的GitHub存储库. We added only the owner and name parameters only in our example above, 但是这两个字段足以让我们访问给定存储库的一般信息.
为了更新我们的数据,我们必须使用GitHub API. For this part, it’s best to be familiar with GraphQL and v4 of the GitHub API.
We also need to create a GitHub access token. The minimum required scopes for that are:
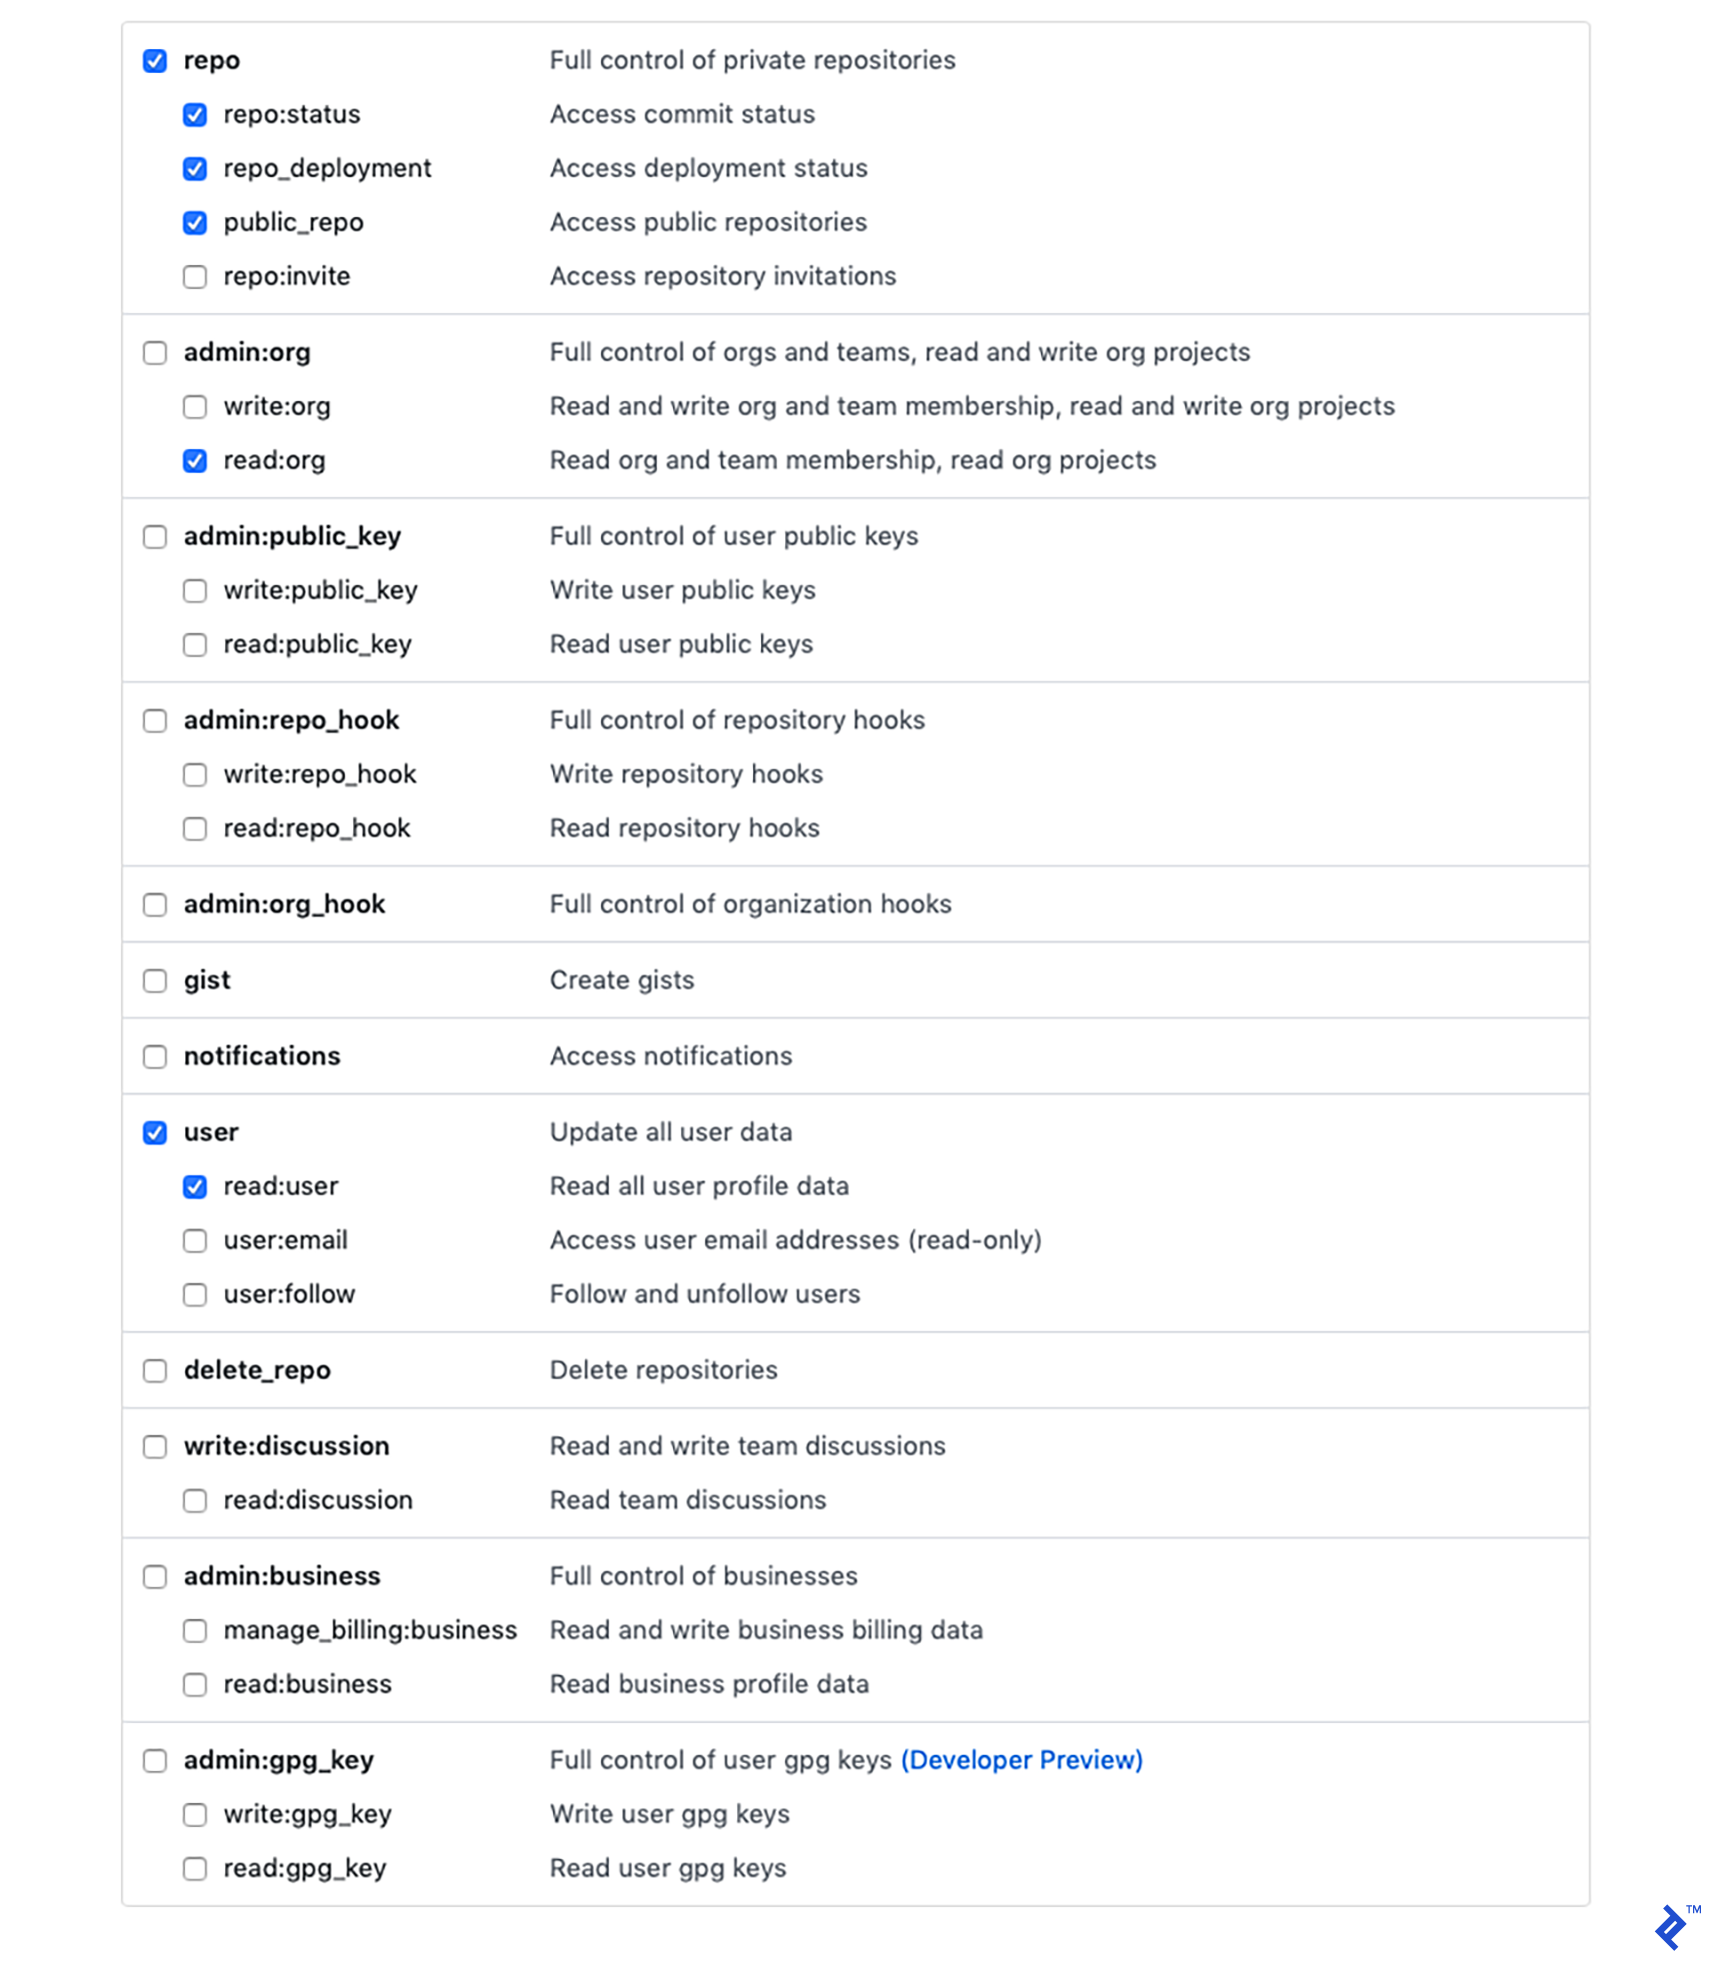
这将生成一个令牌,我们可以用它向GitHub发送请求.
Now let’s go back to our code.
We have two new dependencies in package.json:
"axios": "^0.18.0" 是一个HTTP客户端,所以我们可以请求GitHub API"cron": "^1.7.0" is a cron job schedulerAs usual, run npm install or yarn after adding dependencies.
We’ll need two new properties in config.js, too:
"githubEndpoint": "http://api.github.com/graphql""githubAccessToken": process.env.GITHUB_ACCESS_TOKEN (you’ll need to set the GITHUB_ACCESS_TOKEN 使用您自己的个人访问令牌的环境变量)Create a new file under the controller folder with the name cron.controller.js. It will simply call the updateResositories method of repository.controller.js at scheduled times:
const RepositoryController = require('../controller/repository.controller');
const CronJob = require('cron').CronJob;

function updateDaily() {
  RepositoryController.updateRepositories();
}

exports.startCronJobs = function () {
  new CronJob('0 0 * * *', function () {updateddaily ()}, null, true, 'UTC');
};
The final changes for this part will be in repository.controller.js. 为简洁起见,我们将其设计为一次更新所有存储库. 但是如果您有大量的存储库,您可能会超过 resource limitations of GitHub’s API. 如果是这种情况,您需要将其修改为在有限的批次中运行,随着时间的推移而分散.
更新功能的一次性实现将是这样的:
async function asyncUpdate() {

  await RepositoryModel.list().then((array) => {
    const promises = array.map(getLatestRelease);

    return Promise.all(promises);
  });
}

exports.updateRepositories = async function update() {
  console.log('GitHub Repositories Update Started');

  await asyncUpdate().then(() => {
    console.log('GitHub Repositories Update Finished');
  });
};
最后,我们将调用端点并更新存储库模型.
The getLatestRelease 函数将生成一个GraphQL查询并调用GitHub API. 来自该请求的响应随后将在 updateDatabase function.
updateddatabase (responseData, owner, name) {

  let createdAt = '';
  let resourcePath = '';
  let tagName = '';
  let releaseDescription = '';
  let homepageUrl = '';
  let repositoryDescription = '';
  let avatarUrl = '';

  if (responseData.repository.releases) {

    createdAt = responseData.repository.releases.nodes[0].createdAt;
    resourcePath = responseData.repository.releases.nodes[0].resourcePath;
    tagName = responseData.repository.releases.nodes[0].tagName;
    releaseDescription = responseData.repository.releases.nodes[0].description;
    homepageUrl = responseData.repository.homepageUrl;
    repositoryDescription = responseData.repository.description;

    if (responseData.organization && responseData.organization.avatarUrl) {
      avatarUrl = responseData.organization.avatarUrl;
    } else if (responseData.user && responseData.user.avatarUrl) {
      avatarUrl = responseData.user.avatarUrl;
    }

    const repositoryData = {
      owner: owner,
      name: name,
      createdAt: createdAt,
      resourcePath: resourcePath,
      tagName: tagName,
      releaseDescription: releaseDescription,
      homepageUrl: homepageUrl,
      repositoryDescription: repositoryDescription,
      avatarUrl: avatarUrl
    };

    await RepositoryModel.findByOwnerAndName(owner, name)
      .then((oldGitHubRelease) => {
        if (!oldGitHubRelease[0]) {
          RepositoryModel.create(repositoryData);
        } else {
          RepositoryModel.patchById(oldGitHubRelease[0].id, repositoryData);
        }
        console.log(`Updated latest release: http://github.com${repositoryData.resourcePath}`);
      });
  }
}

async function getLatestRelease(repository) {

  const owner = repository.owner;
  const name = repository.name;

  console.log(`Getting latest release for: http://github.com/${owner}/${name}`);

  const query = `
         query {
           organization(login: "${owner}") {
               avatarUrl
           }
           user(login: "${owner}") {
               avatarUrl
           }
           存储库(所有者:“${owner}”,名称:“${name}”){
               homepageUrl
               description
               release (first: 1, order: {field: CREATED_AT, direction: DESC}) {
                   nodes {
                       createdAt
                       resourcePath
                       tagName
                       description
                   }
               }
           }
         }`;

  const jsonQuery = JSON.stringify({
    query
  });

  const headers = {
    'User-Agent': 'Release Tracker',
    “授权”:“承载器${GITHUB_ACCESS_TOKEN}”
  };

  await Axios.post(GITHUB_API_URL, jsonQuery, {
    headers: headers
  }).then((response) => {
    return updateDatabase(response.data.data, owner, name);
  });
}
在第二次提交之后,我们将实现 一个cron调度程序,从我们的GitHub存储库获取每日更新.
We are nearly done with the back end. 但是最后一步应该在实现前端之后完成, so we’ll cover it in the next article.
在这一步中,我们将把应用程序部署到Heroku,因此 you’ll need to set up an account with them if you don’t have one already. 如果我们将Heroku账户绑定到GitHub上,那么持续部署就会容易得多. To that end, I’m hosting my project on GitHub.
登录到你的Heroku账户后,从仪表板中添加一个新应用:

Give it some unique name:
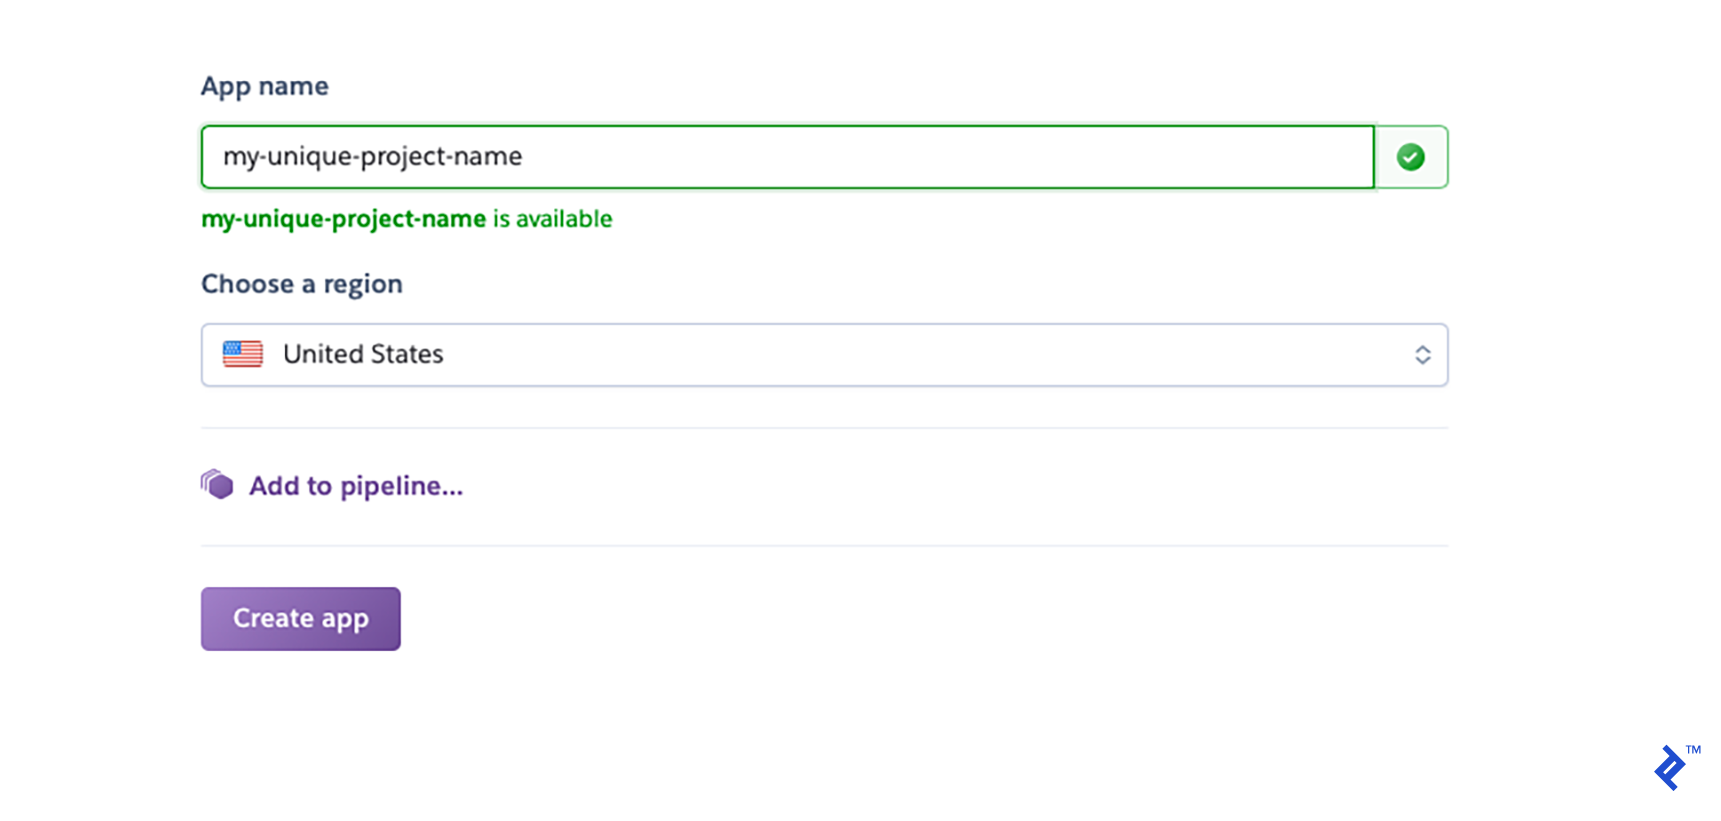
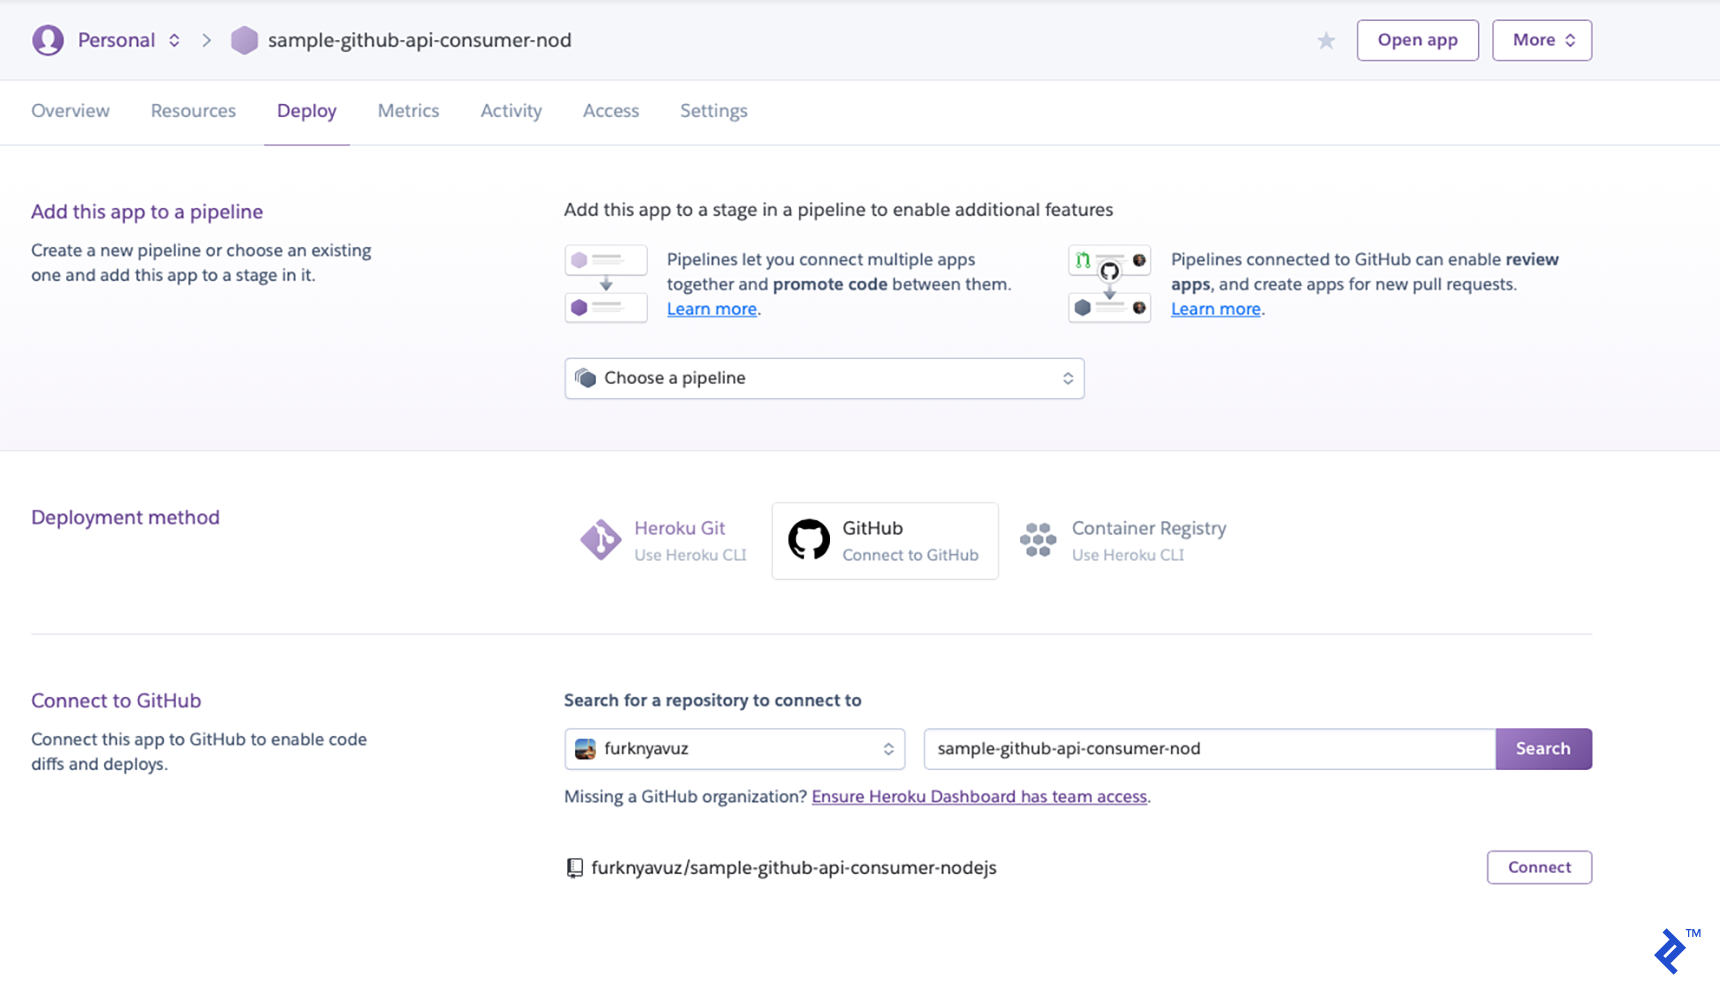
You will be redirected to a deployment section. 选择GitHub作为部署方式,搜索你的存储库,然后点击“连接”按钮:
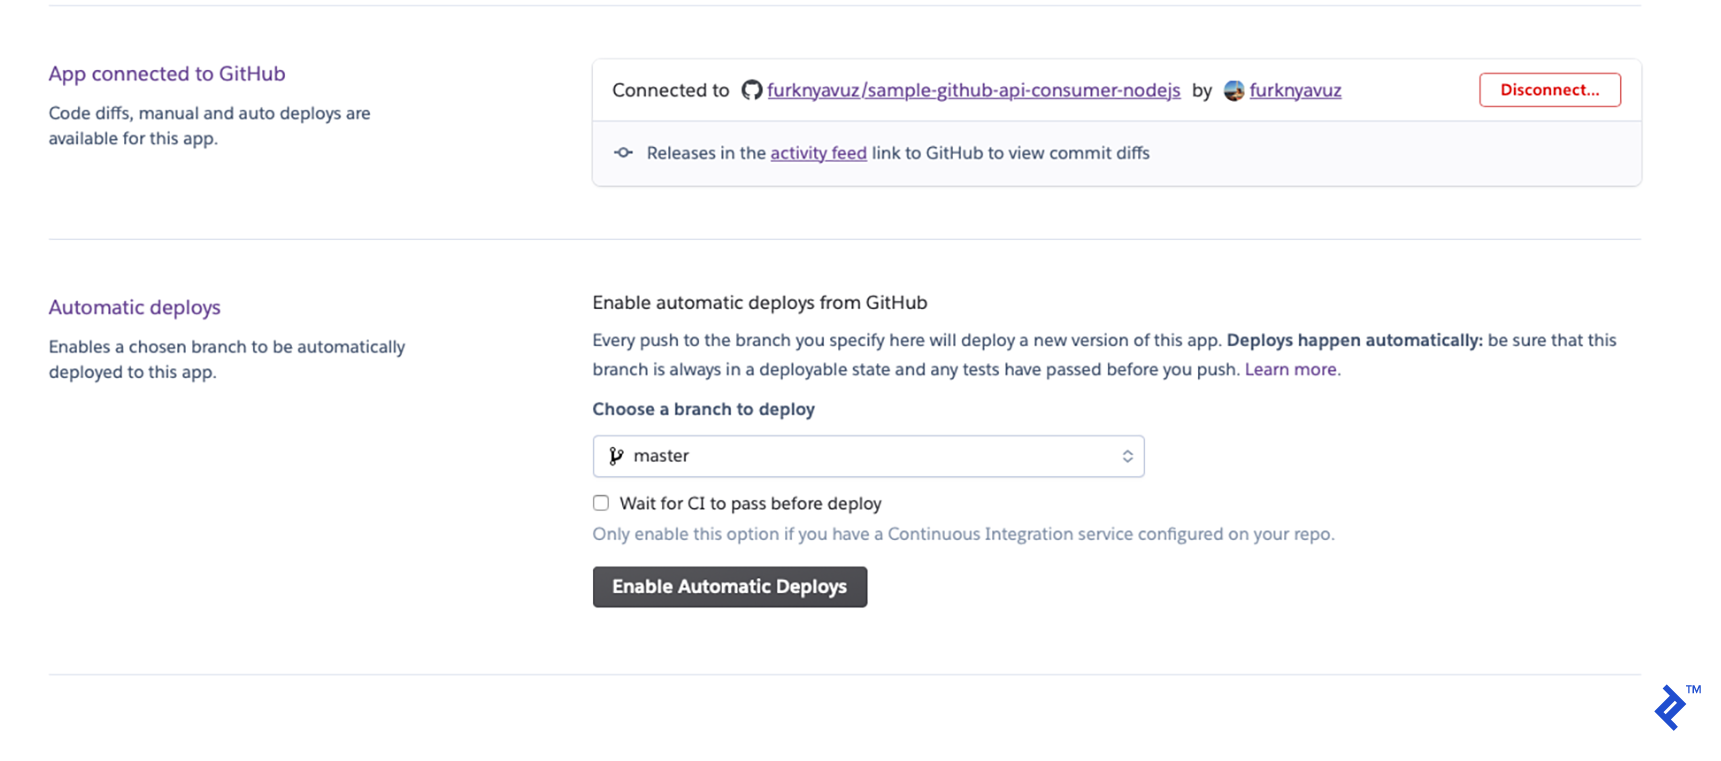
为简单起见,您可以启用自动部署. 它会在你向GitHub仓库推送提交时部署:
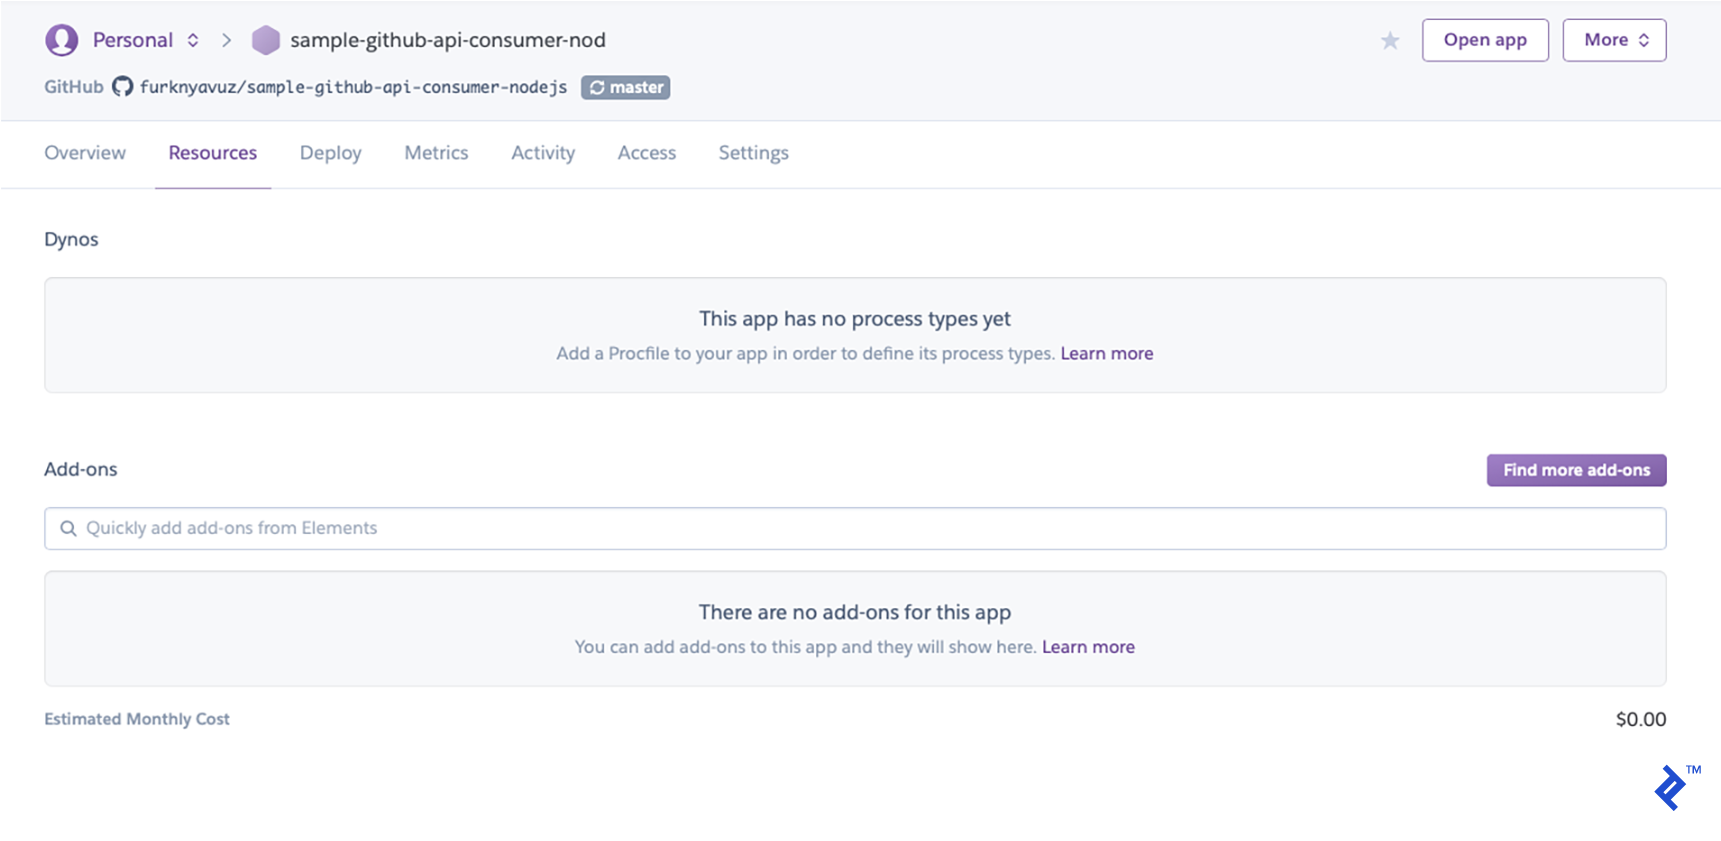
Now we have to add MongoDB as a resource. 转到Resources选项卡并单击“查找更多附加组件”.” (I personally use mLab mongoDB.)
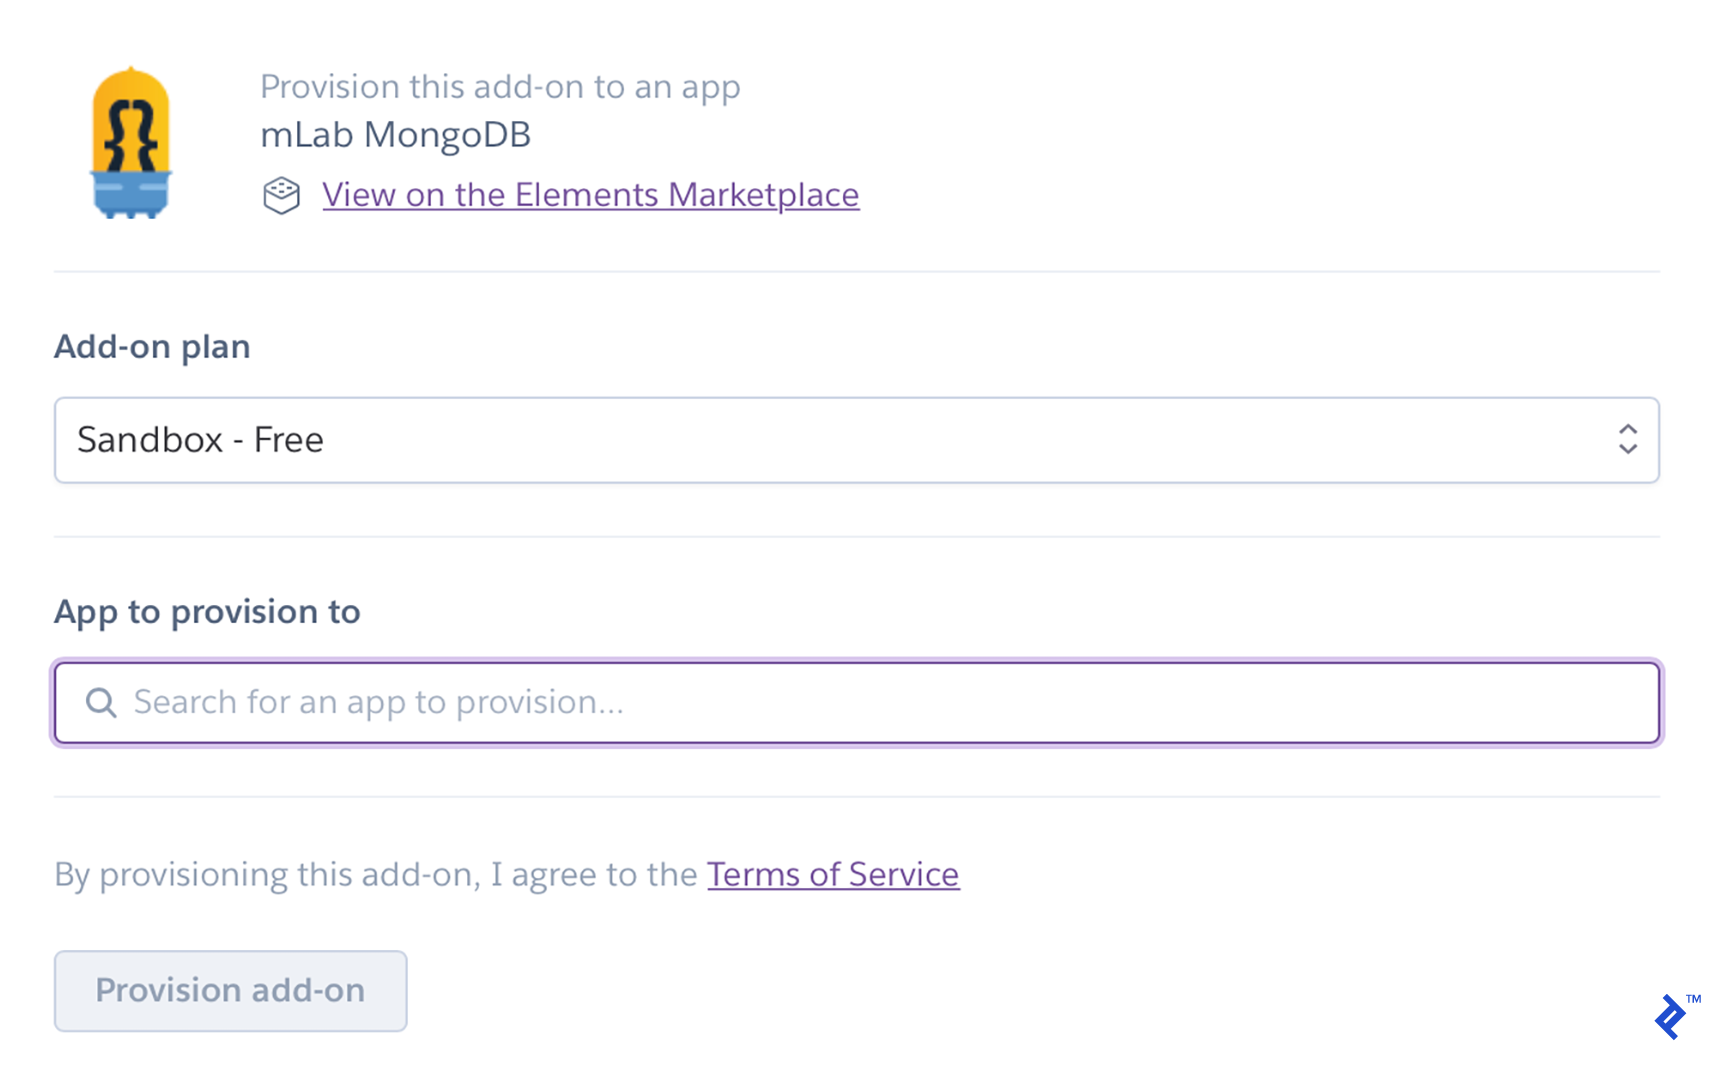
安装它,并在“app to provision to”输入框中输入你的app名称:
Finally, we have to create a file named Procfile at the root level of our project, 它指定了当Heroku启动应用程序时执行的命令.
Our Procfile is as simple as this:
web: node index.js
Create the file and commit it. Once you push the commit, Heroku将自动部署您的应用程序, which will be accessible as http://[YOUR_UNIQUE_APP_NAME].herokuapp.com/.
为了检查它是否工作,我们可以发送与我们发送到的相同的请求 localhost.
After our third commit, this is what our repo will look like.
So far, we’ve implemented the Node.js/Express-based REST API on our back end, the updater that consumes GitHub’s API, and a cron job to activate it. 然后,我们部署了我们的后端,它稍后将为我们的 static web content generator 使用Heroku和钩子进行持续集成. Now you’re ready for the second part,在这里我们实现前端并完成应用程序!
发布后,静态网页包含所有会话的相同数据. 在动态网页中,数据可以动态更新.
Node.Js是轻量级的、快速的、可扩展的、开源的,并且得到了社区的良好支持.
Node.Js作为构建可扩展的后端运行时环境, lightweight, asynchronous, event-driven web applications with JavaScript.
Node.js在服务器端使用与通常在浏览器中使用的相同的语言(JavaScript). 它是轻量级的,设计用于在处理请求时使用非阻塞I/O操作.
作为流行的MEAN堆栈- mongodb的成员,Express.js, Angular, and Node.js—Node.js对于使用JavaScript开发高性能、可扩展的web应用程序非常重要.
GraphQL的一些好处包括只从服务器收集您需要的内容, obtaining multiple resources in one request, and the fact that its APIs are self-documented.
GraphQL支持快速原型和生产部署. 此外,它对所有资源使用单个端点, 这使得客户机-服务器通信更容易.
Heroku是一个专注于简化应用程序启动和扩展的云平台.
Furkan是一名经验丰富的全栈开发人员,自2016年以来一直远程工作. 他的主要专长包括Java、Angular和Heroku.
 作者都是各自领域经过审查的专家,并撰写他们有经验的主题. 我们所有的内容都经过同行评审,并由同一领域的Toptal专家验证.
World-class articles, delivered weekly.
World-class articles, delivered weekly.
Join the Toptal® community.
